In this blog post I’ll demonstrate how to install OpenCV 3 on the Raspberry Pi Zero.
Since I’ve covered how to install OpenCV on the Raspberry Pi in multiple, previous blog posts, I’ll keep this post on the shorter side and detail only the relevant commands necessary to get OpenCV up and running. For a more thorough discussion on how to install OpenCV 3 on your Pi (along with a 22-minute video installation guide), please refer to this post.
I’ll also be making the following assumptions in this installation guide:
- You are using Raspberry Pi Zero hardware (so the timings supplied with each command will match up).
- You have Raspbian Jessie installed on your Pi Zero.
- You want to install OpenCV v3.0 with Python 2.7 bindings (for Python 3 support, see this post).
Again, I have already covered installing OpenCV on multiple Raspberry Pi platforms and Raspbian flavors — the primary goal of this tutorial is to get OpenCV up and running on your Pi Zero so you can get started learning about computer vision, image processing, and the OpenCV library.
Installing OpenCV on your Raspberry Pi Zero
If you haven’t seen the Raspberry Pi Zero yet, it’s a really cool piece of hardware. It packs a single core 1GHz ARM processor. 512mb of RAM. And it’s smaller than a credit card.
But the best part?
It’s only $5!
While the Pi Zero isn’t quite fast enough for advanced video processing, it’s still a great tool that you can use to learn the basics of computer vision and OpenCV.
Step #1: Expand filesystem
If you’re using a brand new install of Raspbian Jessie, then the first thing you should do is ensure your filesystem has been expanded to include all available space on your micro-SD card:
$ sudo raspi-config
Select the first option “1. Expand Filesystem”, arrow down to “Finish”, and reboot your Pi:
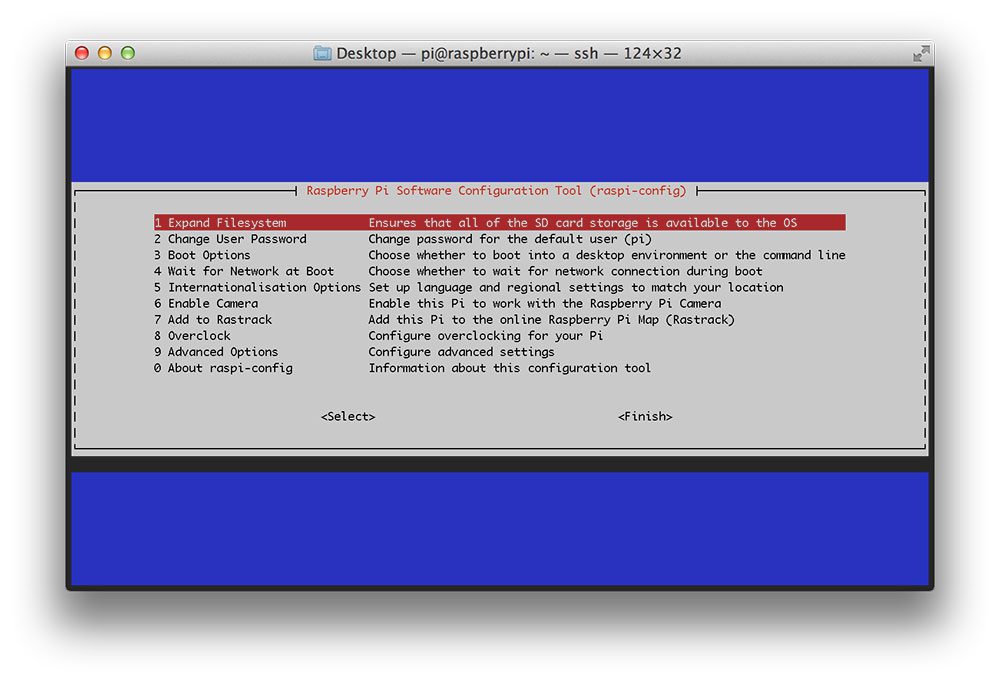
Figure 1: Expanding the filesystem on your Raspberry Pi Zero.
After rebooting, your filesystem will have be expanded to include all available space on your micro-SD card.
Step #2: Install dependencies
I’ve discussed each of these dependencies are in previous posts, so I’ll just provide a brief description, the command(s) themselves, along with the amount of time it takes to execute each command so you can plan your OpenCV install accordingly (the compilation of OpenCV alone takes 9+ hours).
First, we need to update and upgrade our existing packages:
$ sudo apt-get update
$ sudo apt-get upgrade
Timing: 2m 29s
Install our developer tools:
$ sudo apt-get install build-essential cmake pkg-config
Timing: 49s
Let’s grab the image I/O packages and install them:
$ sudo apt-get install libjpeg-dev libtiff5-dev libjasper-dev libpng12-dev
Timing: 36s
Along with some video I/O packages (although it’s unlikely that you’ll be doing a lot of video processing with the Raspberry Pi Zero):
$ sudo apt-get install libavcodec-dev libavformat-dev libswscale-dev libv4l-dev
$ sudo apt-get install libxvidcore-dev libx264-dev
Timing: 36s
We’ll need to install the GTK development library for OpenCV’s GUI interface:
$ sudo apt-get install libgtk2.0-dev
Timing: 2m 57s
Let’s also pull down a couple routine optimization packages leveraged by OpenCV:
$ sudo apt-get install libatlas-base-dev gfortran
Timing: 52s
Lastly, let’s install the Python 2.7 headers so wen can compile our OpenCV + Python bindings:
$ sudo apt-get install python2.7-dev
Timings: 55s
Note: I’ll only be covering how to install OpenCV 3 with Python 2.7 bindings in this post. If you would like to install OpenCV 3 with Python 3 bindings, please refer to this post.
Step #3: Grab the OpenCV source
At this point, all of our dependences have been installed, so let’s grab the
3.0.0release of OpenCV from GitHub and pull it down:
$ cd ~
$ wget -O opencv.zip https://github.com/Itseez/opencv/archive/3.0.0.zip
$ unzip opencv.zip
Timing: 1m 58s
Let’s also grab the opencv_contrib repository as well:
$ wget -O opencv_contrib.zip https://github.com/Itseez/opencv_contrib/archive/3.0.0.zip
$ unzip opencv_contrib.zip
Timing: 1m 5s
It’s especially important to grab the
opencv_contribrepo if you want access to SIFT and SURF, both of which have been removed from the default install of OpenCV.
Now that
opencv.zipand
opencv_contrib.ziphave been expanded, let’s delete them to save space:
$ rm opencv.zip opencv_contrib.zip
Step #4: Setup Python
The first step in setting up Python for the OpenCV build is to install
pip, a Python package manager:
$ wget https://bootstrap.pypa.io/get-pip.py
$ sudo python get-pip.py
Timing: 49s
Let’s also install
virtualenvand
virtualenvwarpper, allowing us to create separate, isolated Python environments for each of our future projects:
$ sudo pip install virtualenv virtualenvwrapper
$ sudo rm -rf ~/.cache/pip
Timing: 30s
Note: I’ve discussed both virtualenv
and virtualenvwrapper
many times on the PyImageSearch blog. If this is your first time using them, I suggest referring to this blog post on installing OpenCV 3 on Raspbian Jessie.
To complete the install of
virtualenvand
virtualenvwrapper, open up your
~./profile:
$ nano ~/.profile
And append the following lines to the bottom of the file:
# virtualenv and virtualenvwrapper
export WORKON_HOME=$HOME/.virtualenvs
source /usr/local/bin/virtualenvwrapper.sh
Now,
sourceyour
~/.profilefile to reload the changes:
$ source ~/.profile
Let’s create a new Python virtual environment appropriately named
cv:
$ mkvirtualenv cv
Timing: 31s
The only requirement to build Python + OpenCV bindings is to have NumPy installed, so let’s use
pipto install NumPy for us:
$ pip install numpy
Timing: 35m 4s
Step #5: Compile and install OpenCV for the Raspberry Pi Zero
We are now ready to compile and install OpenCV. Make sure you are in the
cvvirtual environment by using the
workoncommand:
$ workon cv
And then setup the build using CMake:
$ cd ~/opencv-3.0.0/
$ mkdir build
$ cd build
$ cmake -D CMAKE_BUILD_TYPE=RELEASE \
    -D CMAKE_INSTALL_PREFIX=/usr/local \
    -D INSTALL_C_EXAMPLES=ON \
    -D INSTALL_PYTHON_EXAMPLES=ON \
    -D OPENCV_EXTRA_MODULES_PATH=~/opencv_contrib-3.0.0/modules \
    -D BUILD_EXAMPLES=ON ..
Timing: 4m 29s
Now that the build is all setup, run
maketo start the compilation process (this is going to take awhile, so you might want to let this run overnight):
$ make
Timing: 9h 42m
Assuming OpenCV compiled without error, you can install it on your Raspberry Pi Zero using:
$ sudo make install
$ sudo ldconfig
Timing: 2m 31s
Step #6: Finishing the install
Provided you completed Step #5 without an error, your OpenCV bindings should now be installed in
/usr/local/lib/python2.7/site-packages:
$ ls -l /usr/local/lib/python2.7/site-packages
total 1640
-rw-r--r-- 1 root staff 1677024 Dec  2 08:34 cv2.so
All we need to do now is sym-link the
cv2.sofile (which are our actual Python + OpenCV bindings) into the
site-packagesdirectory of the
cvvirtual environment:
$ cd ~/.virtualenvs/cv/lib/python2.7/site-packages/
$ ln -s /usr/local/lib/python2.7/site-packages/cv2.so cv2.so
Step #7: Verifying your OpenCV install
All that’s left to do now is verify that OpenCV has been correctly installed on your Raspberry Pi Zero.
Whenever you want to use OpenCV, first make sure you are in the
cvvirtual environment:
$ workon cv
And from there you can fire up a Python shell and import the OpenCV bindings:
$ workon cv
$ python
>>> import cv2
>>> cv2.__version__
'3.0.0'
>>>
Or you can execute a Python script that imports OpenCV.
Once OpenCV has been installed, you can remove both the
opencv-3.0.0and
opencv_contrib-3.0.0directories, freeing up a bunch of space on your filesystem:
$ rm -rf opencv-3.0.0 opencv_contrib-3.0.0
But be cautious before you run this command! Make sure OpenCV has been properly installed on your system before blowing away these directories, otherwise you will have to start the (long, 9+ hour) compile all over again!
Troubleshooting
If you ran into any error installing OpenCV 3 on your Raspberry Pi Zero, I would suggest consulting the Troubleshooting section of this post which goes into added detail for each installation step.
The post also includes a complete 22 minute video where I demonstrate how to run each command to flawlessly get OpenCV 3 installed on your Raspberry Pi:

Figure 2: Getting OpenCV up and running on your Raspberry Pi.
Summary
This post detailed how to install OpenCV 3 on your Raspberry Pi Zero. The purpose of this blog post was to provide accurate timings that you can use when planning your own install of OpenCV on your Pi Zero.
In order to get OpenCV up and running, I made the following assumptions:
- You are running Raspbian Jessie on your Raspberry Pi Zero.
- You are installing OpenCV v3.
- You want to use Python 2.7 with your OpenCV bindings.
If you would like to use Python 3+ with your OpenCV bindings, please consult this post, where I have elaborated more on each step, provided more detailed information, and included a 22 minute video that walks you through step-by-step on installing OpenCV 3 on your Raspberry Pi.
The post Installing OpenCV on your Raspberry Pi Zero appeared first on PyImageSearch.